So what is Instagram and why should you be using it?
Most of you probably know that Instagram is a free, social media app where people share photos and videos from their phone. You share a photo onto IG, it shows up on your profile page, and those that follow you enjoy your photo on their IG feed.
Instagram is all about visual sharing.
Businesses use IG to share their products or services and make that personal connection with their followers.
There are a couple of reasons that I use IG. First I want to help people who need images – not only training and passing on my expertise, but also to find new clients. I also want to put a face to my brand – when people visit me on IG, I want them to get a taste for what my business is about – to get to know me. Finally, I want to connect with like-minded people on IG. It is a place where you can make online friends.

I want my Instagram page to
- Share my expertise
- Look beautiful
- Be professional
- Represent my favorite things for work – my branding – social media images, pink, black, flowers, desk mock-ups, and anything coffee.
- Have quotes intermittently placed, but not be too wordy.
- Be personal, with photos of my life where you, my online friends, can get to know me
My problem was –
How do I plan and keep track of all the photos/quotes and what order I want them in?
I needed to create a plan for what I would post on Instagram.
SO, here is what I came up with….
(If you use the Tailwind App to schedule Pinterest and onto Instagram, you can still plan your IG posts using steps 1-5. Then in step 6, you would schedule them from Tailwind.)
1. In one sitting, create 30 IG images for the month.
(If that sounds overwhelming, just do 15 days.)
The recommended size for IG is a square – 1080×1080 pixels.
- When I create each blog post, I create all of my images to include an IG image. If you don’t have 10 posts, or don’t write posts this often, then create new images that have different text or quotes from the post itself. I recommend using 10 blog images.
- Since I want my followers to get to know me, I picked out 4 personal photos that I wanted to share and resized them to a 1080×1080.
- I found 3 beautiful photos that represented my brand – coffee or pink or desk mock-ups – and resized them.
- Next, I designed a ‘Services’ template. These are the services I provide and they are created with a distinctly different look. On my Layout below they are the silver and white sparkle squares – Irresistible Social Media, Gorgeous Instagram Images & Ongoing Image Creation. I recommend 4 images.
- Along the way, I have (and will) create a product or free opt-in. I plan to share 3 a month (or the same one in a different layout).
- To represent my business, I created 3 business graphics. That can include my logo or some other image that represents my business.
- Finally, I created a ‘Quotes’ square where I would put the 3 quotes or teaching I want to share.
You decide the number of images you want for each category. You may want more quotes or not want to include your blog posts. These are the numbers and categories I decided I wanted.
2. Design (or follow) an IMAGE LAYOUT GUIDE
I wanted to create something that told me each day what I was going to post. I didn’t want to have to remember what my layout was, which one to post next, or any of it. I want it to be quick and easy, a 2-3 minute post onto IG every morning.
To get started, I created a document with 30 squares. You can do this in Photoshop, Canva or even in a Word document or Power Point!
I need a general template to follow each month.
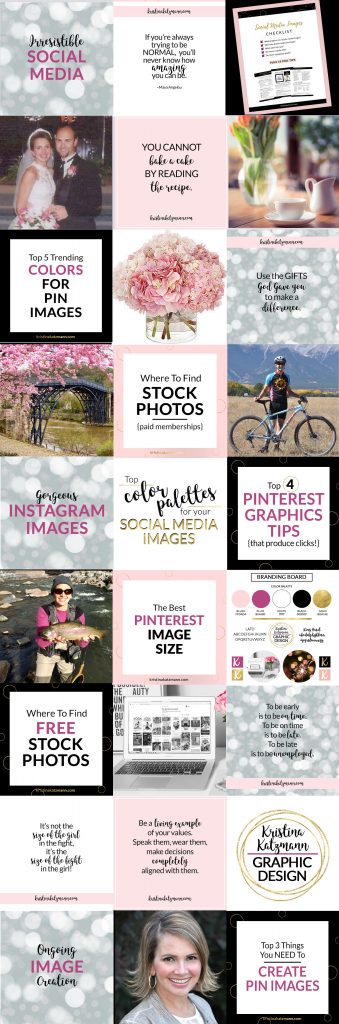
I took the name of the category and spaced them out throughout the 30 squares.
- 10 posts
- 4 personal photos
- 3 gorgeous photos
- 4 service images
- 3 products or opt-ins
- 3 business graphics, and
- 3 quotes
Here is what I came up with.

First, I laid out my ‘blog’ squares, zig zagging back and forth through my page. Then I went in and added each of the other categories, spreading them out a little.
One of the most important reasons for me to have a business IG account is to point it to my website. I want people to go over to read my blog, download my free opt-in, and ultimately purchase a service package.
3. Fill in the photos
Once I have my template, I pull all of the squares that I created over into my Layout Guide following each label. Of course, if you’ve checked my IG account, you can see I don’t always follow this template. You have the option of doing something a little bit different each month.
Then, I stand back to look it over. I asked myself
- Is it all attractive?
- Is it informative?
- Does it look professional?
- Is each image within my branding guidelines (or the ‘look’ I want)?
- Is it too text heavy?
- Does each side look even (as far as coloring or text)?
- Do I love it?
Then, I can go in and change things up wherever it’s needed.
I like to create a full month of Instagram images so that it’s done.
You may not have all of your blog posts created for the upcoming month, but you can leave the text ‘blog post’ or the post title in that square to remind you to post your latest blog post.
I created my last Layout Guide with the blog post image there and now it’s forcing me to keep on schedule for this post. If I have it scheduled for IG, then I better have it written and published on my website!
4. Compress all the photos
For every image, I compress it to a smaller size so that it doesn’t take up as much space on my website and social media sites. I use tinyjpg.com. I download my images to their site, it compresses them, and then I resave it to my computer.
5. Download all of these images into a Google Drive folder
I have Google Drive on my computer and on my phone. You can also use Dropbox or whatever other saving mechanism you use. You need to have access to it from your phone. Find whatever works for you.
6. On your phone, create #hashtag groupings and save them in a notes app
I downloaded an app on my phone to write notes and reminders on. Instead of making up and typing out #hashtags every day when I’m posting, I wrote them out in my notes app so that I can go in and copy and paste them into IG.
For each area that I’m focusing on, I create #hashtags.
- Pinterest images
- Instagram images
- Facebook images
- Opt-in pages
- General info/images
They recommend that you not use the same #hashtags for every IG post.
The first #hashtag I include on every image is ALWAYS my URL (remember, do not include ‘http/:’ or ‘www’ – so mine is kristinakatzmann.com – only) and what my business is about. So for images where I’m concentrating on Pinterest images, I would include the following #hashtags:

I also add any other #hashtags that come to mind for each image.
You will need to do some research to find what #hashtags you need for your business.
Mine are all listed on my notes app where I copy and paste them quickly over into my IG post.
7. Post daily onto your IG page.
Each day, I post onto IG like this:
- Consult my Image Layout Guide (from Google Drive on my phone) for which image I’m needing to download for the day
- Find that photo and bring it up into IG
- Usually do not use a filter
- I think about what I want to write. If you’ve posted on IG before, you know that it doesn’t let you skip lines to break up your text. I would write a bit, then hit enter, then type a period and then hit enter again. It didn’t end up working out. So, I found THIS LINK to an app that helps you get the correct spacing!! Try it out – Caption Maker!
- Write a quick blurb about what that image represents (in Caption Maker). Copy and paste it into IG.
- From my notes app, copy and paste the #hashtags, adding any additional ones I think I should include, and finally,
- Publish it!

I’m a firm believer in writing down the plan. If you do not write down your goals, they more than likely will not happen. That goes for my IG planning too.
This Image Layout Guide for Instagram is a lifesaver for me. After creating my IG squares (which I’m going to do anyway) it takes me about 10-15 minutes to pull them into this guide.
This guide is my lifeline for IG. Now, I
- Have a plan
- Get my images posted
- Fulfill my goal of using Instagram for my business
Pop on over to IG and follow me HERE.
Let me know how you strategize your IG posting and how it’s going for you. You are welcome to use this Image Layout Guide!
Happy Designing,
![]()